 | Hello Guest - Sign In or New Account |
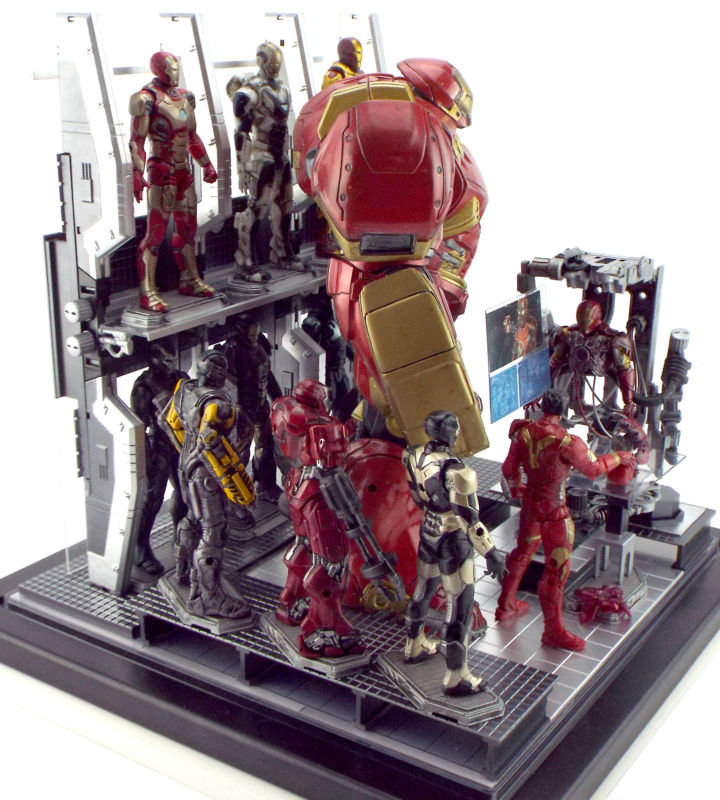
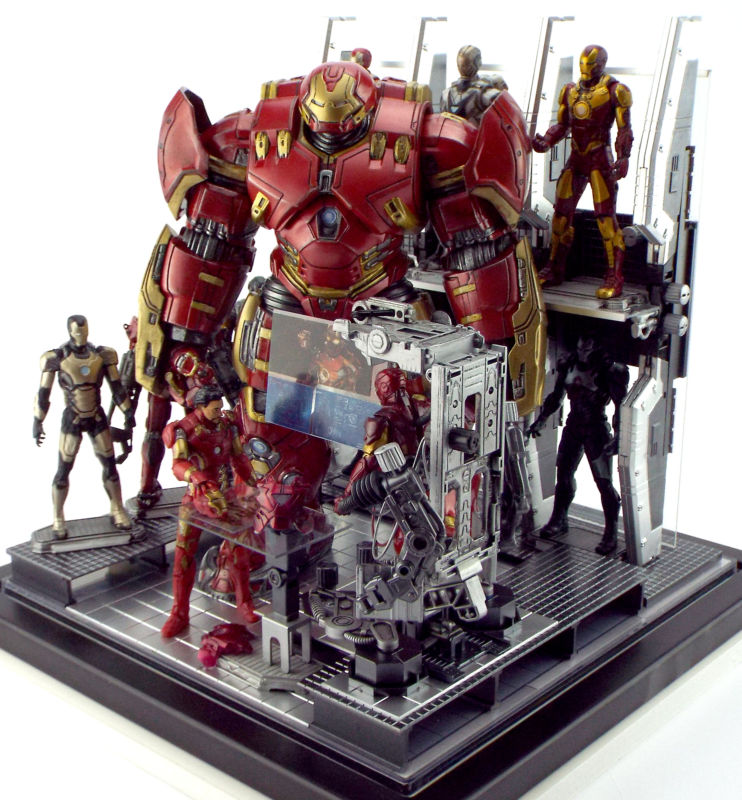
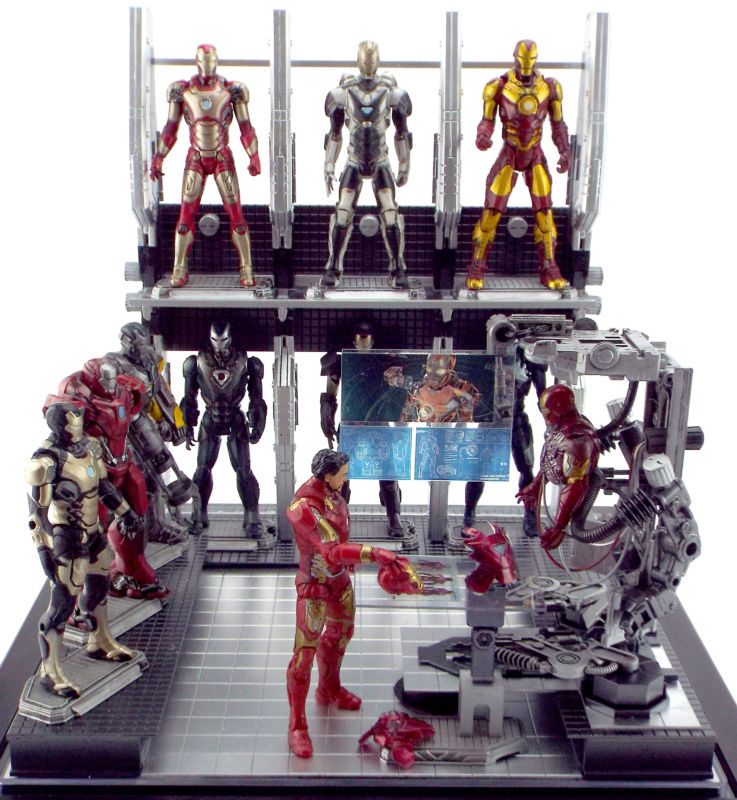
This project started out as a display for the 3.75” Hasbro Avengers: Stark Tech Assault Armor which I was in the process of modifying. I wanted to create a diorama with the feel of Tony Starks garage or lab by taking visual cues from the Iron Man 2 & 3 movies. I also wanted to build my own version of a Hall Of Armor as a backdrop and feature a selection of some of the more interesting armors that I had collected. Many hours were spent sifting through my discarded toy and parts bins to try and find the right parts that best fit my vision. My search also included local discount and thrift stores looking for anything that looked futuristic or architectural in design. Having found the basics of what I needed, I started to piece together and assemble the project. I started by selecting the 10”x10”x10.25” Museum Collector’s display case. This particular case has a clear plastic cover and floor that fits into a black wooden base. It is ideal for keeping the diorama relatively free of dust. Next, on computer, I designed and rendered a faux metal floor to place under the clear display floor. Cheap but effective. With the display case set, I started arranging, through trial and error, the various pieces I had chosen to build the basic structure of the Hall Of Armor and lab. Using a variety of Plastistruct pieces, I started fabricating multiple sub assemblies for the armor bays and lab flooring. It was then that I hit a snag. I wanted to build a two tiered armor wall as a backdrop but ran into some serious stability problems. The biggest problem with the armor wall was that I wanted a structure that was minimal so that it wouldn’t obstruct the view of the armor on display. I had recently discarded the scratch-built armor bay sub-assemblies in favor of some re-purposed Ben 10 Space Station parts to be used as partitions. They had a futuristic industrial look and design that was visually better overall. This unfortunately added more weight to the second tier making the whole back wall structure top heavy and unstable. I tried different types of bracing for stability but they either didn’t look right or were just too bulky and detracted from the look and feel of the design. I felt it was time to step back and reassess the design aspects of this project. While pondering the back wall situation, I proceeded with the modifications of the Stark Tech Armor. I wanted to transform the suit from a it’s original concept as an exoskeleton to a full on battle suit. I searched the internet for ideas and came across some really great custom modifications and started stockpiling images for future reference. Work on the modification was a slow process as there was a lot of trial & error, test fitting and re-working of parts. All seemed to be going well until I made the decision to try and articulate the suit. . . . . bad idea. This would delay the project again due to my re-working things that had already been done. The end result being totally unsatisfactory. Long story short, it was back to the drawing board for me and even more delays. Eventually, the Iron Man Project got put on the back burner again as I hit another wall in the design and development stage. Luckily for me I have a Man Cave where I can leave all my unfinished projects laying around in a dusty mess, undisturbed, behind closed doors. Time passes and other projects get more attention and actually finished. This included a Captain America: Winter Soldier display in 3.75” and a 12” Hasbro Titan Age Of Ultron Hulkbuster custom repaint. What brought the Iron Man Project back to life was my purchase of a Marvel Legends Age Of Ultron Hulkbuster Build-A-Figure. I then decided to substitute the Stark Tech Armor for the AOU Hulkbuster and the project started to take on a whole new direction. The Iron Man Project started coming together again with the custom repaint of the Marvel Legends AOU Hulkbuster. The customization was a major project in itself starting with the research and disassembly then painting, detailing, weathering and finishing taking a just over a month to complete. There were some major problems with the paint getting tacky and a lot of time was spent trying to stabilize the paint. Many hours were also spent meticulously hand painting all of the fine details on the various disassembled parts and pieces. After reassembly and paint touch-ups came the application of several layers of dark washes and dry brush highlighting that brought the Hulkbuster to the final finished state. Though technically out of scale with 3.75” figures, the large size made it a more imposing figure. The result of that work was inspiration enough to rethink and redesign an entirely new diorama to showcase the Hulkbuster. Starting with the display case, a new floor and side platforms were created using Plastistruct Tile sheets and I-Beams. Next up was the back wall. The stability problem was remedied by creating 4 partition sub-assemblies and attaching them to a clear sheet of plastic which made the wall stable with great visibility. The whole structure was done in a silver and gun metal color scheme. When all sub-assemblies and major components were complete, I began building the actual diorama. I started with the multi-level floor paneling using 1/8” and 1/2” tile sheet plastic that I had pre-painted. Next I positioned the Hall Of Armor back wall structure. The finished structure was stable and had that tech look that I was going for. I installed a pair of risers on either side of the floor for added dimension and kept the whole color scheme to silver and gunmetal. With that, the base of the diorama was pretty much done. While rummaging through my parts bins I came across some remnants from a Transformer toy that had very interesting details and articulation. Taking the idea from the half finished Iron Man Mk. III armor display by Hot Toys, I decided to create my own version of it for my diorama. This new addition would also have to be designed to fit into the limited space of the display. I had also noticed that the increased size of the Hulkbuster ended up obscuring most of the back wall. It was then suggested by a friend that I might try placing the Hulkbuster at an angle to better fit the tight confines of the display and allow for a better line of sight to the back wall. That seemed to be just the right adjustment needed as it also created more visual interest. With the Garage/Lab done, I started detailing the armor for the back wall. I decided to use the Hasbro Iron Man 3 Assemblers for this. These action figures were considered a step down in quality from the previous Iron Man 2 line. With limited paint apps and 5 point articulation, the Assembler line was pretty crappy but were just fine for static background props. After some detailing with shoe polish and Rub-N-Buff, they looked pretty good. For the partially built up Iron Man suit I used the upper torso, head and chestplates from the Reactor Shift figure as well as a few other pieces from the parts bin. For the Tony Stark figure I used a Hasbro Mk. 43 from an Avengers 2 pack and a recast Tony Stark head that I purchased from an on-line site. The end game was in sight as everything started to come together. I decided to re-orient the half built Mk. III and Tony Stark to face inward and added a set of monitors and a work table. The screen images used for the monitors were Iron Man graphics I found on-line, scaled down then printed onto clear laser printable sheets. They were then glued onto clear plastic scrap pieces that were cut to size. With these final touches, the Iron Man Project, now re-named “The Mechanic’s Garage”, was finally done. Four years in the making, wow! It’s been said that the end of a journey is the most satisfying but for me, the road we take to get there has always been the most interesting. It’s been a long journey of learning, frustration, triumph, discovery and accomplishment.  |
| Sabretooth (Age of Apocalypse) |  | Submission Order |  | Saesee Tiin |
| Iron Man mark 47 | | Iron Man Series | | riri williams |
| None | | Created by Jinyei | | Winter Soldier Display |


 Update Your Custom
![The Mechanic's Garage (Iron Man) Custom Diorama / Playset [Mechanic's Garage 02]](userimages/customs/93000/thumb_92822-2-5a4ee0b7e9e1a.jpg)
![The Mechanic's Garage (Iron Man) Custom Diorama / Playset [Mechanic's Garage 03]](userimages/customs/93000/thumb_92822-3-5a4ee07a35e4d.jpg)
![The Mechanic's Garage (Iron Man) Custom Diorama / Playset [Mechanic's Garage 04]](userimages/customs/93000/thumb_92822-4-5a4ee0476b471.jpg)