 | Hello Guest - Sign In or New Account |
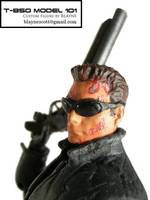
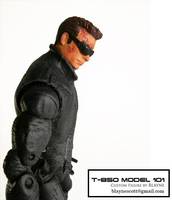
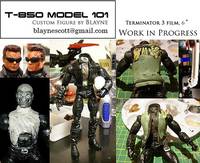
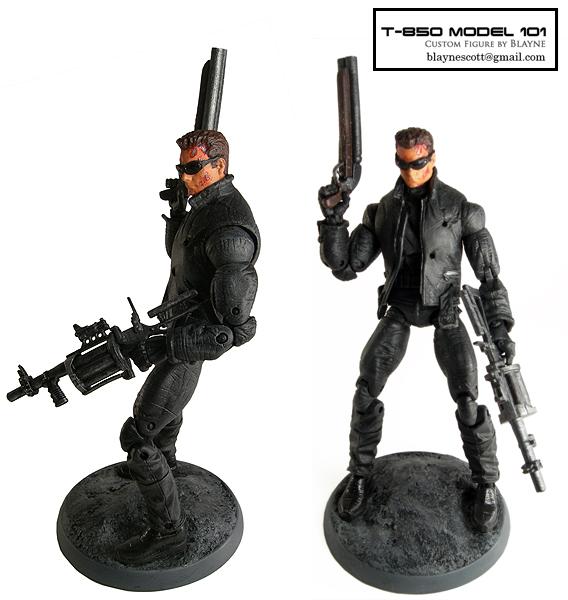
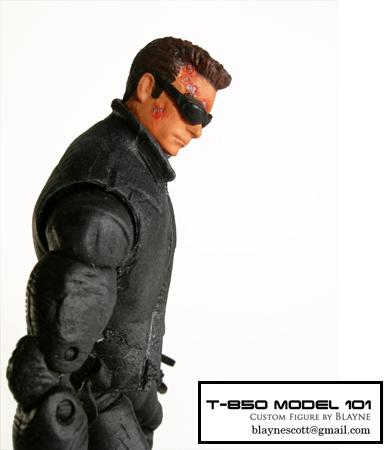
Arnold Schwarzenegger as THE TERMINATOR. He's back: But this time in correct ML 6" scale and a detachable head. ;) ::Recipe: -ML Xorn figure (torso, arms, part of jacket, upper legs, boots) -ML Blade figure (lower legs) -ML Jigsaw hands -McFarlane T3 Arnold figure (Part of Jacket, Glasses, large gun) -x1 Black Aracknis head cast (of a 1992 KENNER Terminator figure) -x1 Viking cast of Forge's Shotgun (dremeled down handle) -Marvel Legends circular base ::Supplies: x2 Neonium magnets (Spherical) from gaussboys dot com -A good cordless dremel -Hair dryer -Gel-type Superglue -Vallejo paints and Matte Varnish -Citadel Glossy Varnish and Matte Spray Sealant -Apoxie Sculpt (under shirt) -Citadel Green Stuff (for Jacket) -Sanding Sponge -Hobby plaster (for faux-rocky ground base) ::How to: When I set out to make this figure, I wanted to have the option of multiple heads for one body (battle damaged, Endo skull, etc). I achieved this by cutting off the figures neck, and super-gluing 2 rare earth magnets (neonium, non epoxy coated) into both the head and neck base. By using a larger magnet (almost the diameter of the whole neck), the head is very poseable, but won't fall off. -I used the hair dryer method of swap out the lower legs on a ML Blade figure, and Jigsaw's hands. -Spliced using superglue and a hobby knife parts of the McFarlane T3 jacket onto the Xorn jacket base. -Dremmeld down and re sculpted the ML Xorn figures chest/neck. I used Aves Sculpt it on the chest, but *not* the jacket. The reason being: Citadel 'Green stuff' epoxy is a little bit flexible. Aves product drys bone hard, and can be very brittle if it's sections are too thin. I went over the green stuff with a very fine Dremel grinding head in a light cross-hatching motion. After it's sanded, it adds a great leather-like texture. This is highlighted later with some light dry brushing. -For the head, (over the course of 6 months) I gave it 6 different paint jobs. I was still learning how to paint flesh tones at this point. ;) This worked in my favor, as when I used the tip of my hobby knife to scratch away 'battle damaged' areas, there was a visible height difference. Painted the inlaid areas silver, then made a light red/brown wash for the wounded effect. -Dremmeled down the McFarlane T3 glasses to fit this figure's head, superglued them on, and painted eyebrows on Arnold. Finished painting the hair, as well as the shotgun and large gun. -Created a faux-stone stand for this figure using Hobby plaster (the kind found at model train stores, mix with water and let dry). Sanded this, Basecoated in Krylon Black acrylic, painted it with various shades of Vallejo, and used super glue as an extra layer of sealant around the foot peg areas. Sprayed twice with Citadel matte finish sealant. -Used the superglue joint protection technique on all of the Terminators joints that could be afflicted by paint rub. -Sprayed with Citadel Matte sealant, T3 glasses (lenses) and metal sections re-sealed using Citadel Glossy varnish) * * * ::Why this figure? I've wanted a Terminator figure like this since I first saw Schwarzenegger kneecap an entire SWAT team in Terminator 2. ;) I remember being very disappointed with the old Kenner T2 figures (what was with those exposed abs?), and similarly with the stature-figures McFarlane released for T3. When I saw the Xorn figure, I knew there was great potential for a fully posable 6" scale Terminator figure. It also gave me an opportunity to improve my skills as a customizer. I started making this figure in December of 2007, and gradually finished it by December 2008. Regards, -Blayne  |
| Super Hero Movie |  | Submission Order |  | The Green Ranger |
| Terminator with Harley | | Terminator Series | | Terminator T2 Arnold with |
| Ghost Rider | | Created by Briightcore Toys | | Pinhead the Cenobite |

 Update Your Custom
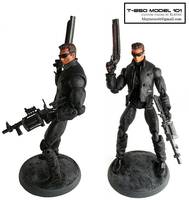
As you can see in the mini-tutorial image above, my approach was different than 'VariablePenguins'. I used the same sized magnet in the neck, but I put a large neonium (rare earth) magnet in the head as well, instead of 2 small disc magnets.
I did this with my Terminator custom because the headcast had a neck built into it, and I didn't want to convert it to a ML/DCU style head-type.
Hope this info helps.
Cheers,
-Blayne
-Blayne
I'm actually wondering if you can go into some more details about that interchangeable head, I'm curious to see how you maintained poseability with the magnets. any pictures of that?
perhaps even a tutorial?
this is something I definitely want to be able to do with my customs.