 | Hello Guest - Sign In or New Account |
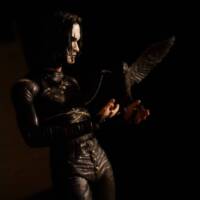
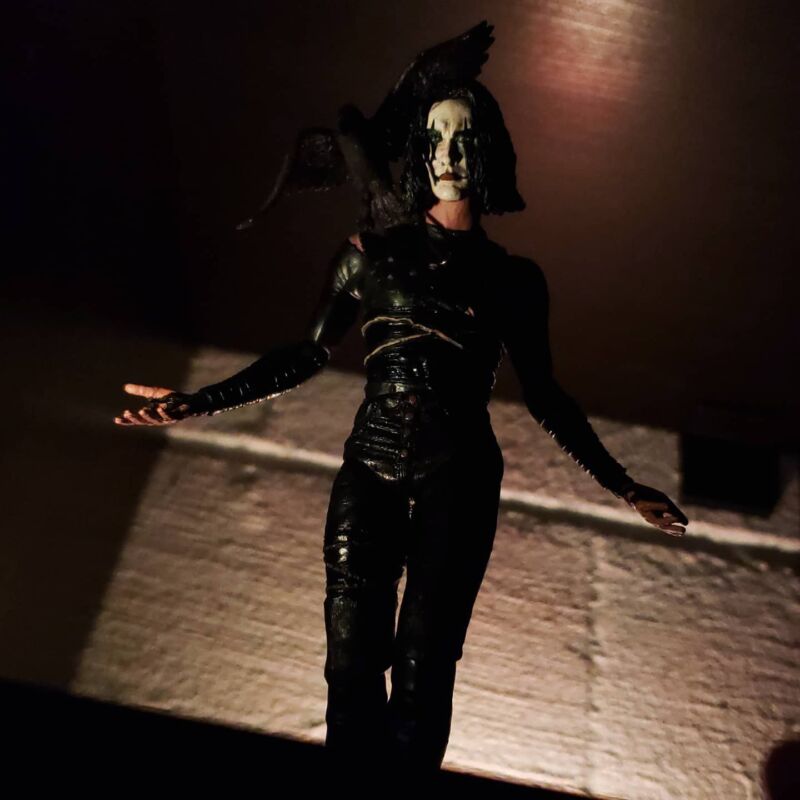
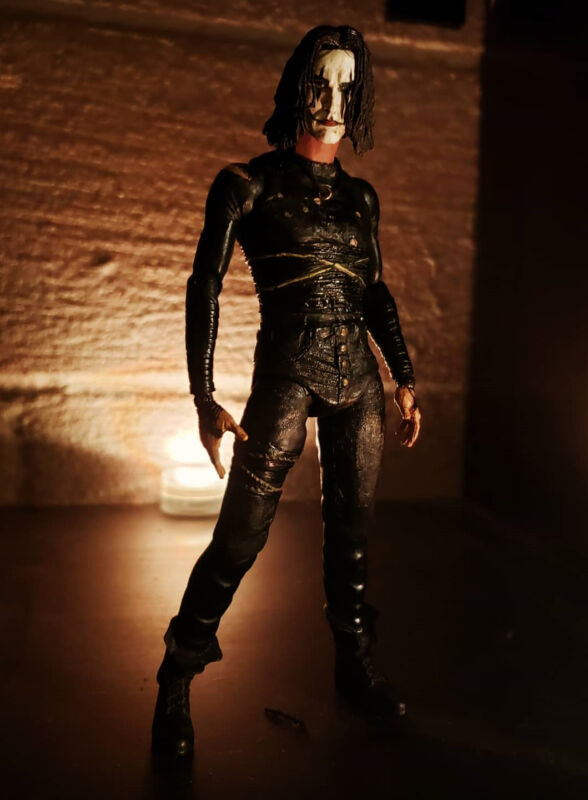
This figure was a really big labor of love for me. It's the Eric Draven figure I've wanted my whole life. I have to give a big shout out to Shinigami Customs for inspiring this with their own build. I felt particularly pushed to make this after seeing Diamond Select's Crow figure and thinking that it looked like a Fortnite skin. Sort of cartoony, but not in a purposefully artistic way. Just in a way that's easier than making it look realistic. Figure Recipe Breakdown: • Head, torso, and hands: NECA Cult Classics Eric Draven • Neck, hips, and upper legs: NECA Ultimate Fairwell to Arms Ash Williams (the Ash from the Ash vs Evil Ed 2-pack would also work, but why destroy the cooler, rarer figure?) • Arms and lower legs: Diamond Select Walgreens exclusive "Collector" version Crow figure. Also used modified wrist pegs from a McFarlane Toys 5" Connor Kenway figure to make the hands work with the articulation. The rest of this is going to be a very in-depth, anecdotal essay on what this build was like, for anyone looking to recreate, learn from, or build upon it. I'm bad at disseminating information in a way that's easy to digest, especially when I get really into what I'm writing about, so y'know, lots and lots of words. Fair warning. I've also put together an Imgur album for additional visual context, but since links aren't allowed here, I can't post it. If you'd like a link to it, just message me on my Instagram @LochNessHamster, along with any questions you might have, and I'd be happy to help. I don't get on Figure Realm very often. I started with disassembling the Cult Classics Eric Draven figure and removing the trench coat. The entire torso is fully sculpted, but it has some peg holes in the chest and back where the coat was glued in. It's slightly preposed to be bent back, but I don't mind that. It suits Eric Draven. While the Cult Classics figure does have a waist swivel, the cut is in the middle of the torso, so it would look weirdly short if I were to just pop it off there. I had to cut the figure in half, which was a huge pain in the ass. It took a lot of heat and multiple xacto knives, because they kept getting stuck in the plastic. I made the cut a little lower than what I thought would be the right place, just to make sure I had enough material to work with. You can always remove more later. The torso will have to sit partially below the top of Ash's pants, so I made sure to keep a little bit of the torso below where the pant detail on the Cult Classics figure starts starts. You want the hem of the Ash diaper to line up with the hem of the sculpted pant detail on the Cult Classics torso. If you were to cut the torso in half right where the pants on the Cult Classics end, then the Ash pants would ride up way too high and his body would look too short. Once I had the torso piece right, I just rounded off the edges on the bottom. The Ultimate Ash legs connect to the torso with a regular ball joint, which is fairly easy to dremel out if you know what you're doing. The torso of the Ash figure doesn't sit flush with the diaper piece, because it's designed for the soft plastic shirt to go over it and bulk it up. So I wound up modifying the hip piece underneath the diaper by cutting away everything that wasn't essential to articulation and keeping the diaper from losing its form (which also increased the range of torso articulation a bit). I also dremeled away a lot of the material immediately underneath the hip's ball peg, which gave it a longer stem, so that it could go deeper into the torso, therefore allowing the torso to sit lower, and the hem of the pants to sit higher and more flush with the figure. Does that make sense? No? Cool. The modified neck/head articulation isn't entirely necessary. The Cult Classics Eric figure has a swivel that looks fine, but I wanted it to have a full ball joint. I just popped the head off the body, then widened and deepened the port hole in the torso, until it was basically a full sized neck hole, which went about a third of the way into the torso. Then I carved the neck out of the Ultimate Ash torso, leaving a lot of extra length, down to about the upper abdomen. I used my dremel to smooth it all out to one long, even neck piece, which could peg into the hole I made in the Cult Classics torso. I also polished the surface of the neck, removing the dirty dark wash over the body to reveal the lighter skin tone underneath. The hard part of all this was reworking the head to fit Ash's neck. Most Ultimate NECA figures use a straight peg, which is a lot easier to make a tight fit hole for than a ball peg. But the real hard part was just cutting away the neck, and making the right shape socket for the neck to fit into, without stripping away too much detail. The color of the plastic is actually black, not flesh tone, so I made a point to leave as much of the flesh tone as possible, because it won't chip away over time the way acrylic paint would. I just did my best to examine the way the Ash heads are cut; along the jawline up to the ear, and then straight across the back of the head to the other ear. Thankfully his hair hides a lot of the crimes, so I just had to make it functional, not especially pretty. Speaking of hair, my figure had a problem where the hair was starting to come off already. The hair is comprised of two wig pieces, a small piece for the bangs in the front, and then a big piece for the rest of the hair. The bangs were already falling out, and I was able to unpeg the big hair on the sides, but it started to tear before I could remove it in the center. I only wanted to remove it to make dremeling and painting easier, not to take it off permanently. But I was able to get enough of it off the head that I could fold it inside out and get it out of the way. It just needed a lot of heat to get it to sit back in its natural shape again afterwards. For the legs, the lower legs of the Diamond Crow figure actually use the exact same type of peg that the NECA figure uses, so that was just a simple swap. The main problem with this is the obvious difference in texturing between the two legs. I don't have a solution for this yet, but I want to address it eventually. Originally I was going to use the Ash lower legs, dremeling the bottom half of the calves into little pegs that could fit into peg holes I made in the boots from the Cult Classics Eric, which would then only be able to swivel. I went for less work and more articulation, with a small sacrifice in aesthetics. For the bit of tape around the right leg, I cut the sculpted tape off of the Diamond figure's leg, and hollowed it out from the inside until it was like this thin band of material. Then I dremeled a groove in the NECA Ash leg that it could sit flush in. It wasn't quite the right shape, so I wound up cutting the tape band in the back and shortening it, then used a high strength epoxy to glue it as tight and flush as I could. When it dried I used Miliput to fill in whatever gaps were there, and complete the sculpt in the back where I cut the band. If you're a better sculptor than me, then you could avoid this headache entirely by just sculpting the band of tape from scratch. I probably could've gotten it to look good with enough time and effort. I'm not a great sculptor, but I am good at throwing mud at the wall over and over until I get something that looks good. I decided to go with frankensteining pieces together in a way I knew could work, rather than having to rely solely on my spotty sculpting abilities. And, finally, the elephant in the room, let's talk about the arms. Not quite the hardest part of the build, but definitely the most scary. Everything hinged on getting them right. I had kind of an idea of what I was doing, but I was mostly making it up as I went along. I just closely examined the ball sockets from the Diamond figure, and did my best to recreate them on the Cult Classics figure. The torso on the Cult Classics has more shoulders than the torso on the Diamond, or any other figure with ball jointed shoulders, so I cut away a significant chunk off either shoulder until I had a silhouette that resembled the Diamond figure. Then I just did my best to dremel out a ball socket. I kept making ball sockets that were about the right shape, but not deep enough. I just kept going deeper and deeper, until finally it started to look right, and then deeper still. I also dremeled away some of the material on the sides of the torso, right under the ball sockets, so he could put his arms straight down, and wasn't stuck with that "come at me bro" vanilla pose. I don't really have a good way to describe this whole process, you just have to kind of look at how a ball socket works and do your best to figure it out. It's similar to creating a ball socket in the bottom of a head, if you've ever done that, but the positioning and angle are much more important. I intentionally left the sockets a little gappy so they could function like a false butterfly joint, then I could get them level with each other and fill in the gaps with sculpting material. If you feel like you have no idea how to even try to tackle something like this — don't do it. The wrist pegs — which are only necessary if you really want that classic open palm hand gesture for the figure, otherwise you could just use the stock Diamond gripping hands — came from an old Mcfarlane 5" Connor Kenway figure. They were shaped very weirdly, but functionally were your standard ball hinge wrist pegs like Mezco, Mcfarlane, Figma, Revoltech, and plenty of other companies use. I just used my dremel to shape the arm-end of the ball hinge to fit the holes in the Diamond arms. (You might have noticed a recurring theme of just throwing the dremel at problems while screaming and making dinosaur noises) The pegs that went into the hands were very small. I cut the hands down to where the palm meets the wrist and hollowed out a tiny ball socket — if you're this far into the build you should be comfortable with that by now. I didn't have any kind of dremel bit thin enough to make a hole for the pegs, so I wound up just digging a hole out with a thumb tack, then using random objects around the house that were about the right thickness to jam into the thumbtack hole until it was wide enough to fit on the wrist pegs. This is probably not a good way to do this, but it's the only method I could come up with. In theory a wrist peg from a figure from any of those companies I mentioned above could work, you'd just have to make sure the peg that goes into the arm is as long and thin as the ones the Diamond hands use, and that the peg that goes into the hand is just small enough that you won't punch through the hand trying to make a peg hole. If you've ever made your own joints with threaded screws and stuff before, you'd have no problem here, but you also probably don't need me to explain any of this to you either. Or just, y'know, stick with the Diamond Select hands. Or just use any other open palm/style pose Diamond Select hand and make it look like the Crow's taped up hands. Honestly I don't recommend doing what I did, but it worked. Other miscellaneous details include smoothing out the belt and and belt-loop detailing on the diaper bit, and also sculpting on the four buttons for the button-up fly. I've had problems with small bits like this falling off very easily when sculpted straight on to a smooth surface, so dremeled little holes where each button would go for additional grip. I also sculpted the tear over the right shoulder, the hole in the shitt on the left bicep, and filled in the peg holes on the torso with sculpting material, and then also used a combination of sculpting material and careful dremeling to get the edges of the ball joints as smooth and symmetrical as possible. They're still not quite perfect, but it looks good, and that's what's important. All sculpting was done with black Miliput. The figure also has this weird, inexplicable bump on the center of the chest. It's not on the 18 inch version of the figure, but it's present on all 7 inch figures, so I think it's just a mess up on the mold that nobody ever caught. I smoothed that out, and also put a thin layer of Miliput over the whole chest to smooth out some of the old factory glue residue, and just get rid of the general roughness of it. Made sure not to fill in any of the shirt holes. Painting was all done with Testors Model Masters Acrylic paint. The paints I used were flat black, flat white, semi-gloss black, full gloss black, neutral gray, warm flesh tone, gold, and yellow. I mixed a few different levels of gloss black to get different visual textures across the different surfaces on the figure. Hair and pants were semi-gloss, with the hair being slightly more matte. Shirt was all matte, and the tape was all full gloss. Used a mixture of gray, black, yellow, and gold for the buttons, and also used that to complete the string on the back of the leg-tape-band-thing. Flesh tone was a careful mixture of warm skin tone, gray, white, and a little yellow and maybe a touch of blue? Matching skin tones is hard. Painted all skin tone parts on the figure to make it match, as well as the holes in the shirt, both original and newly sculpted. I also did a few dots of flesh tone where there should've been holes on the shirt but I didn't feel like sculpting them. It looks fine. I also touched up the eyes just a little. I'm not great with eyes, but I brought out a little more humanity by making the whites of eyes more visible. Also made the makeup on the eyes a little more movie accurate. Don't be lazy. Use paint thinner. Do like 30-50% thinner for covering large areas, and like 10-20% thinner for smaller details. Never use straight acrylic paint for anything but the very tiniest of details, like pupils. The feet on my NECA crow accessory (as in the bird) had broken off a long time ago, so I replaced them with the feet from the crow that came with the Diamond figure. The Diamond crow is way too big, more like a raven, and just badly sculpted. Stiff and unnaturally symmetrical. Badly pegged together from separate pieces that aren't articulated. Just bad. The feet are one of the separate pieces, which I could pull out without any heat or much force. Just came right out. I smoothed out the leg stumps on my NECA crow, drilled some little holes for the new feet to peg into, and used Miliput as a filler material and adhesive. No paint was necessary. Honestly, it looks better than it did when it was new. The feet were really big and awkwardly positioned. These look much more natural. I also used a touch of gloss black on the eyes and beak of the crow to make them pop a little more. I also ordered a softgoods trench coat for the figure from figuresky on eBay, but it hasn't arrived yet. I'll be sure to update with an additional picture of that when it comes in. I'll also update if I figure out a good solution for the difference in texture between the upper and lower legs. Hope this was informative, or at least an interesting read. Good luck in your own projects! TL;DR: I made this. I like it. I think it's good.  |
| Vigor v3 |  | Submission Order |  | Captain America Avengers 2012 movie accurate |
| Eric Draven The Crow | | Crow Series | | The Crow |
| Carnage | | Created by Loch Ness Hamster | | None |


 Update Your Custom
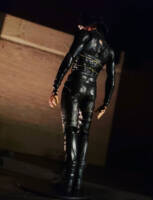
